10 Jun 2023
This article is a based on the talk of the same name given to the 2023 Preservica User Group in Oxford.
Introduction to webhooks and APIs
Webhooks are a type of API which allow apps to stay up-to-date with real-time information. Webhooks are
also called event-driven APIs and are typically used to provide other applications with real-time data.
Using webhooks, applications can send data automatically to 3rd party systems when certain events are triggered within
an application. Unlike the traditional process of “polling” in which a client asks the application if anything has
changed, web hooks automatically send out information to subscribed systems when certain events have happened.

Preservica Webhooks
Webhooks are a new API introduced in Preservica v6.8. They are based on a publisher-subscriber pattern.
Preservica is the publisher and will send messages to all registered subscribers when certain events are
triggered within the system.
The key difference between webhooks and traditional APIs is Who triggers the process.
With traditional APIs the trigger is an event outside Preservica and with webhooks the trigger is an
event inside Preservica. The result is that you do not have to continually poll Preservica to get new information.
This allows users to build custom business processes and workflows which are triggered based on events within Preservica.
Webhooks work best when you need to take some action when something new has happened within Preservica.
Preservica has provided two events as part of the first webhook release with Preservica v6.8. More events will be
added in future versions.
- Ingesting Assets
- Moving Assets
Webhook Documentation
The webhook API is documented in the official Preservica Swagger pages
and the 3rd party pyPreservica Python SDK

The following examples below will use the Preservica SDK pyPreservica

Subscribing
Before a system can receive notifications from Preservica, it must subscribe to a notification trigger.
When creating a new subscription service, you need to generate a shared secret and pass it as an argument to the
subscribe method. This is then used by the subscriber to verify the messages sent by Preservica (publisher) are genuine
(to prevent spoofing attacks). Its known as a shared secret because its held by both the publisher (Preservica) and
the subscriber (web hook server).
Using the PyPreservica SDK to create a new subscription for Ingested events, you pass the address of a web service which
can receive HTTP POST requests. This could be a web server or some API gateway service. If you use a web server it
must provide a publicly accessible endpoint. If you are running a local server for testing purposes it will need to use some
kind of ingress service to make it publicly accessible.
Along with the URL and the shared secret, you need to pass an argument which specifies which type of even you are interested in.
The INDEXED event is triggered at the end of the ingest process after the content has been full text indexed and
thumbnails are available.
To use the Preservica Webhook API requires the user making the API call
to have at least the repository manager role, ROLE_SDB_MANAGER_USER
The following pyPreservica python script for creating a new subscription is
from pyPreservica import WebHooksAPI

webhook = WebHooksAPI()

subscription = webhook.subscribe("http://my-preservica-webhook.com:8080", TriggerType.INDEXED, "my secret key!")
where http://my-preservica-webhook.com:8080 is the web hook endpoint URL.
During the subscription process, Preservica will send a challenge response message to the specified
endpoint URL to verify that it exists and its publicly accessible.
Preservica sends a POST request to the URL with a challengeCode query parameter.
The server must respond with the expected challenge response or the subscription will fail.
The response sent back to Preservica takes the form of a simple json document which includes the original challenge
code and a hexHmac256Response which is a hexadecimal encoded hmac256 of the challenge Code using the shared secret as the hmac key.
{
  "challengeCode": "challengeCode",
  "challengeResponse": "hexHmac256Response"
}
Therefore, the web hook process will need a copy of the secret key to verify requests.
Receiving Events
To receive web hook notifications pyPreservica provides a reference web server implementation which includes
support for the negotiation of the challenge request handshake during the subscription request and
verification of each subsequent webhook event.
To implement the web server, extend the base class WebHookHandler from the SDK and implement a
single method do_WORK() this method is called every time Preservica calls the web hook.
This method is therefore where any processing takes place. This method is passed a python dict object containing
information about the event such as Asset references etc.
class MyWebhook(WebHookHandler):
  def do_WORK(event):
    # Do something useful
The handler can then be used to create a web server, the web server should be run from the same directory as a
pyPreservica credential.properties file containing the shared secret which was used earlier to create
the web hook subscription.
The WebHookHandler extends the standard Python BaseHTTPRequestHandler base class and will provide the handshake and
message verification automatically. Only verified messages are actioned. This class is part of the pyPreservica SDK.
class WebHookHandler(BaseHTTPRequestHandler):
    """
    A sample web hook web server which provides handshake verification
    The shared secret key is passed in via the HTTPServer

    Extend the class and implement do_WORK() method
    The JSON document is passed into do_WORK()

    """

    def hmac(self, key, message):
        return hmac.new(key=bytes(key, 'latin-1'), msg=bytes(message, 'latin-1'), digestmod=hashlib.sha256).hexdigest()

    def do_POST(self):
        result = urlparse(self.path)
        q = parse_qs(result.query)
        if 'challengeCode' in q:
            code = q['challengeCode'][0]
            signature = self.hmac(self.server.secret_key, code)
            response = f'{{ "challengeCode": "{code}", "challengeResponse": "{signature}" }}'
            self.send_response(200)
            self.send_header("Content-type", "application/json")
            self.end_headers()
            self.wfile.write(bytes(response.encode('utf-8')))
            self.log_message(f"Handshake Completed. {response.encode('utf-8')}")
        else:
            verif_sig = self.headers.get("Preservica-Signature", None)
            if "chunked" in self.headers.get("Transfer-Encoding", "") and (verif_sig is not None):
                payload = ""
                while True:
                    line = self.rfile.readline().strip()
                    chunk_length = int(line, 16)
                    if chunk_length != 0:
                        chunk = self.rfile.read(chunk_length)
                        payload = payload + chunk.decode("utf-8")
                    self.rfile.readline()
                    if chunk_length == 0:
                        verify_body = f"preservica-webhook-auth{payload}"
                        signature = self.hmac(self.server.secret_key, verify_body)
                        if signature == verif_sig:
                            self.log_message("Signature Verified. Doing Work...")
                            self.log_message(payload)
                            self.send_response(200)
                            self.end_headers()
                            self.do_WORK(json.loads(payload))
                        break
The following is an example Python web server which can respond to Preservica web hooks.
In this example the web hook server downloads the thumbnail image for every ingested asset.
from http.server import HTTPServer
from sys import argv
from pyPreservica import *

BIND_HOST = '0.0.0.0'
PORT = 8080


class MyWebHook(WebHookHandler):
    def do_WORK(self, event):
        for reference in list(event['events']):
            ref = reference['entityRef']
            asset = self.server.client.asset(ref)
            self.server.client.thumbnail(asset, f"{ref}.jpg")


if __name__ == '__main__':

    config = configparser.ConfigParser(interpolation=configparser.Interpolation())
    config.read('credentials.properties', encoding='utf-8')
    secret_key = config['credentials']['secret.key']

    if len(argv) > 1:
        arg = argv[1].split(':')
        BIND_HOST = arg[0]
        PORT = int(arg[1])

    print(f'Listening on http://{BIND_HOST}:{PORT}\n')

    httpd = HTTPServer((BIND_HOST, PORT), MyWebHook)
    httpd.secret_key = secret_key
    httpd.client = EntityAPI()
    httpd.serve_forever()
The web server can be then be started from the command line using.
$ python3 server.py 0.0.0.0:8000
Use Cases
The typical use case for web hooks is when you want to take some action after new material has been ingested into
Preservica. For example, you may wish to add additional descriptive metadata to an Asset from an external metadata
management system. The list below provides a few examples of where a web hook may be more appropriate than a traditional
polling API.
- Catalogue lookup after ingest
- Transcribe video or audio after ingesting AV material
- Send an automatically created access version of an Asset to a discovery platform
Microsoft Teams Integration
This use case shows how we can chain webhooks together to allow 3rd party systems to communicate with each other.
We are going to use Microsoft Teams as the 3rd party system as Teams provides incoming webhook functionality.
We can connect an outgoing Preservica webhook to an incoming teams webhook to transfer information into Teams.

The end result is that every Asset ingested into Preservica will automatically
send a notification into a Microsoft Teams channel.
We will use the python library pymsteams to help create the
messages
Our web hook server now looks like:
from http.server import HTTPServer
from sys import argv
from pyPreservica import *
import pymsteams

BIND_HOST = '0.0.0.0'
PORT = 8080

class MyWebHook(WebHookHandler):

    def teams_message(self, asset):
        myTeamsMessage = pymsteams.connectorcard(self.server.teams_url)
        myTeamsMessage.color("red")
        # create the section
        myMessageSection = pymsteams.cardsection()
        myTeamsMessage.title("Preservica has ingested a new asset")

        # Section Title
        myMessageSection.title(asset.title)
        # Facts are key value pairs displayed in a list.
        myMessageSection.addFact("Asset Title", asset.title)
        myMessageSection.addFact("Asset Description", asset.description)

        for bitstream in self.server.client.bitstreams_for_asset(asset):
            myMessageSection.addFact("BitStream Name",  bitstream.filename)
            myMessageSection.addFact("BitStream Length", f"{bitstream.length} Bytes")

        # Section Text
        myMessageSection.text("Asset Metadata")
        # Section Images
        myMessageSection.addImage(f"https://ua.access.preservica.com/download/thumbnail/IO_{asset.reference}")
        # Add your section to the connector card object before sending
        myTeamsMessage.addSection(myMessageSection)
        myTeamsMessage.addLinkButton("View the Asset in UA", f"https://ua.access.preservica.com/uncategorized/IO_{asset.reference}")
        myTeamsMessage.summary("Test Message")

        myTeamsMessage.send()


    def do_WORK(self, event):
        for reference in list(event['events']):
            ref = reference['entityRef']
            asset = self.server.client.asset(ref)
            self.teams_message(asset)

if __name__ == '__main__':

    config = configparser.ConfigParser(interpolation=configparser.Interpolation())
    config.read('credentials.properties', encoding='utf-8')
    secret_key = config['credentials']['secret.key']

    if len(argv) > 1:
        arg = argv[1].split(':')
        BIND_HOST = arg[0]
        PORT = int(arg[1])

    print(f'Listening on http://{BIND_HOST}:{PORT}\n')

    httpd = HTTPServer((BIND_HOST, PORT), MyWebHook)
    httpd.secret_key = secret_key
    httpd.client = EntityAPI()
    httpd.serve_forever()
Every ingest now creates a new Teams message containing information about the Asset, for example

Event Driven Serverless Architecture
In the examples above, a web server is used to receive the web hook notifications. This can turn out to be
inefficient as the web server needs to be running on a server even when no notifications are being sent.
In turns out that webhooks are especially well suited to modern serverless architecture
such as Amazon Lambda and Azure Functions. Running a dedicated web server can be inefficient and unnecessary.
AWS Lambda and Azure Functions are code fragments which are triggered to run from external events
such as web hooks. This is a simple and cost-effective approach to processing events.
- No application server provisioning and maintenance required
- Web server infrastructure is provided for you through the API Gateway
- Only pay for the milliseconds used
- Highly Scalable
- Secure
AWS has a dedicated set of infrastructure based on the API Gateway service
which allows public API endpoints to be created. These API endpoints act as the “front door” for the
webhook applications managing traffic management, CORS support, authorization and access control,
throttling, and monitoring etc. For the Preservica webhook use case the API gateway only needs to accept HTTP
POST requests.

When the API gateway receives a webhook notification it will pass the message payload from Preservica to the
AWS Lambda function which will carry out the appropriate action.
AWS Lambda supports multiple languages such as Java, Go, PowerShell, Node.js, C#, Python, and Ruby code, so you
can build your applications in the language of your choice.
A basic AWS Lambda function for Preservica web hooks in Python would look something like
    import json
    import os
    import hmac
    import hashlib


    def lambda_handler(event, context):
        secret_key = os.environ.get('PRES_SECRET_KEY')
        if 'queryStringParameters' in event:
            if event['queryStringParameters'] is not None:
                if 'challengeCode' in event['queryStringParameters']:
                    message = event['queryStringParameters']['challengeCode']
                    signature = hmac.new(key=bytes(secret_key, 'latin-1'), msg=bytes(message, 'latin-1'),
                                         digestmod=hashlib.sha256).hexdigest()
                    return {
                        "statusCode": 200,
                        "headers": {
                            "Content-Type": "application/json"
                        },
                        "body": json.dumps({
                            "challengeCode": f"{message}", "challengeResponse": f"{signature}"})
                    }
        else:
            if 'Preservica-Signature' in event['headers']:
                verify_body = f"preservica-webhook-auth{event['body']}"
                signature = hmac.new(key=bytes(secret_key, 'latin-1'), msg=bytes(verify_body, 'latin-1'),
                                     digestmod=hashlib.sha256).hexdigest()
                doc = json.loads(event['body'])
                if signature == event['headers']['Preservica-Signature']:
                    for reference in list(doc['events']):
                        ref = reference['entityRef']
                        ## DO WORK HERE
                    return {
                        "statusCode": 200,
                        "headers": {
                            "Content-Type": "application/json"
                        },
                        "body": json.dumps(event['body'])
                    }
Where we are fetching the shared key from the environment variables.
The event information sent to the lambda function comprises a json document with a body field which looks like
    {
      "subscriptionId":"9495ddbf7d4a0b9f030a3411c87f967d",
        "timestamp":"2023-10-11T10:52:42.469",
        "tenant":"BRAMA",
        "version":"6.10",
        "events":[{
            "event":"FullTextIndexed",
            "entityType":"IO",
            "entityRef":"7fdea7e0-1e72-4fb1-aadb-d7f9ee6ed8c2",
            "identifiers":[]}],
        "trigger":"FULL_TEXT_INDEXED"
    }
From this json document the entity type and entity reference of the ingested Asset can be extracted.
19 Feb 2023
This article is a repost from one published on the Preservica Developer Blog.
Preservica provides a REST API to allow users to query the underlying search engine. The Search engine provides access to all the indexed information within a Preservica system, this includes the standard metadata attributes such a title, description etc. and also any organization specific custom indexes added by users.
This API is available for all on-premise and Cloud Professional Edition customers and above.
This REST API is documented at https://eu.preservica.com/api/content/documentation.html
In this article we will show how CSV documents can be returned by the API, CSV is a convenient format because it can be opened directly within spreadsheet software such as LibreOffice or MS Excel. Once inside a spreadsheet post processing such as filtering, sorting and charting can easily be applied to the data to create custom reports.
Search Indexes
Before using the search API, it’s a good idea to familiarize yourself with the available indexes held by the search engine. This will give you an idea of what information can be returned by the search queries and therefore what can be reported on.
You can determine the available indexed fields within a Preservica repository by calling the following endpoint.
/api/content/indexed-fields
You can call the API using any REST client such as Postman, but for following examples we will use the 3rd party python library pyPreservica.
pyPreservica is an easy to install Python client which takes care of the authentication, xml parsing and error handling automatically.
Using pyPreservica the list of fields is available using:
from pyPreservica import *

search = ContentAPI()

for index in search.indexed_fields():
    print(index)
This will print all the available indexes, The default indexes available in every system start with the xip prefix, but the list will also contain any custom indexes created when using a custom search index rules document.
xip.format_r_Display
xip.format_r_Preservation
xip.full_text
xip.identifier
xip.is_valid_r_Display
xip.is_valid_r_Preservation
xip.order_by
xip.parent_hierarchy
xip.parent_ref
If an index on a metadata attribute is not available, its straightforward to create a new index using a custom search configuration.
You can now use these indexes to create your search query.
Simple Reports
Using the raw REST API you would first create a JSON document containing the search terms and POST it to the endpoint.
/api/content/search
The JSON document syntax is described in the Swagger documentation.
Again to simplify the process we will use the pyPreservica client which creates the JSON document for you.
To create a report using the basic “google” type search which searches across all the indexes we use the
method.
You can include any query term to search on, the special % character matches on everything in the repository.
This function will search the Preservica repository for the term supplied in the query argument across all indexes and save the results into a UTF-8 CSV file which can be opened in MS Excel.
For example, the following script will create a CSV file containing everything in the repository.
from pyPreservica import *

search = ContentAPI()
search.simple_search_csv(query="%", csv_file="results.csv")
By default the spreadsheet columns correspond to the following indexes
- xip.reference The entity reference of the asset or folder
- xip.title The title of the asset or folder
- xip.description The description of the asset or folder
- xip.document_type The type of entity, e.g, “IO” for asset and “SO” for folder
- xip.parent_ref The entity reference of the parent folder
- xip.security_descriptor The security tag
Once opened in Excel, then you can use the standard tools for filtering and sorting the tabulated data.

You can customise the CSV file and select your own spreadsheet columns by adding a list of indexes you would like to see in the output as the last argument of the function. For example you could search for the term “Oxford” across all the indexes and have the resulting CSV file include two Dublin core attributes as columns.
from pyPreservica import *

search = ContentAPI()

indexes = ['xip.reference', 'xip.title', 'oai_dc.identifier', 'oai_dc.subject']

search.simple_search_csv("Oxford", "oxford-results.csv", indexes)
Fielded Reports
This method described above works well as long as you want to query across all the available indexes, if you want to do more selective reporting such as filtering results based on specific index values then you need to use a different function search_index_filter_csv().
To filter the results of the query you need to pass a Python dictionary rather than a simple list, the dictionary elements contain the index names as above and also the index values.
For example, to only return Assets from the query we can filter on the xip.document_type index, assets are indexed using the term “IO” for intellectual objects and folders are indexed using “SO” for structural objects.
from pyPreservica import *

search = ContentAPI()

filters = {'xip.document_type': 'IO'}

search.search_index_filter_csv("Oxford", "oxford-results.csv", filters)
This returns a CSV document with a column for each filtered field.
If you want to include additional columns in the resulting CSV file but don’t want to filter on their values, then leave the filter value empty, e.g.
from pyPreservica import *

search = ContentAPI()

filters = {'xip.document_type': 'IO', 'xip.title': '', 'xip.description': ''}

search.search_index_filter_csv("Oxford", "oxford-results.csv", filters)
To return only Assets with an open security tag we could use:
from pyPreservica import *

search = ContentAPI()

filters = {'xip.document_type': 'IO', 'xip.security_descriptor': 'open' }

search.search_index_filter_csv("Oxford", "oxford-results.csv", filters)
This example queries for the term “Oxford” across all indexes and also filters for the term “University” within the full text index which has been extracted from the text within documents.
It returns only assets which have the security tag “open”
from pyPreservica import *

search = ContentAPI()

filters = {'xip.document_type': 'IO', 'xip.security_descriptor': 'open',  'xip.full_text': 'University’}

search.search_index_filter_csv("Oxford", "oxford-results.csv", filters)
If you want to limit your search to assets within a single folder, then you can use the parent reference filter, passing the reference of the folder of interest.
from pyPreservica import *

search = ContentAPI()

filters = {'xip.document_type': 'IO', 'xip.security_descriptor': 'open',  'xip.full_text': 'University’, 'xip.parent_ref': '123e4567-e89b-12d3-a456-426614174000'}

search.search_index_filter_csv("Oxford", "oxford-results.csv", filters)
If you want to search for objects within a folder hierarchy, i.e. recursively down the hierarchy then replace xip.parent_ref with the xip.parent_hierarchy index.
from pyPreservica import *

search = ContentAPI()

filters = {'xip.document_type': 'IO', 'xip.security_descriptor': 'open',  'xip.full_text': 'University’, 'xip.parent_hierarchy': '123e4567-e89b-12d3-a456-426614174000'}

search.search_index_filter_csv("Oxford", "oxford-results.csv", filters)
Providing Feedback
Searching across a large Preservica repository is quick, but returning large datasets back to the client can be slow. To avoid putting undue load on the server pyPreservica will request a single page of results at a time for each server request. This paging is handled automatically by the pyPreservica client.
If you are using the simple_search_csv() or search_index_filter_csv() functions which write directly to a CSV file then it can be difficult to monitor the report generation progress.
To allow monitoring of search result downloads, you can add a Python call back object to the search client. The call back class will be called for every page of search results returned to the client. The value passed to the call back contains the total number of search hits for the query and the current number of results processed. The allows the current report progress to be displayed and updated on the console as the script is running.
You can create your own call back functions or use the default provided by pyPreservica
from pyPreservica import *

search = ContentAPI()

search.search_callback(ReportProgressConsoleCallback())

filters = {'xip.document_type': 'IO', 'xip.security_descriptor': 'open',  'xip.full_text': 'University’, 'xip.parent_hierarchy': '123e4567-e89b-12d3-a456-426614174000'}

search.search_index_filter_csv("Oxford", "oxford-results.csv", filters)
This script will now display onto the console a message like:
Progress: |██████████---------------------------------------------| (10.18%)
as the search progresses.
Counting Results
Sometimes you don’t need the full search results, only the number of elements in the search results, i.e the search hit count.
The number of hits can be evaluated using the search_index_filter_hits() function
from pyPreservica import *

search = ContentAPI()

filters = {'xip.document_type': 'IO', 'xip.security_descriptor': 'open',  'xip.full_text': 'University’, 'xip.parent_hierarchy': '123e4567-e89b-12d3-a456-426614174000'}

hits = search.search_index_filter_hits("Oxford", "oxford-results.csv", filters)
Having the hit count can be useful for creating frequency histograms etc, the following is a simple python script which uses the pygal charting library to generate a histogram of the number of assets within a Preservica repository by security tag.
The script first queries the API for a list of security tags used by the system and for each security tag, it uses the search API to fetch the number of assets which that tag.
import pygal
from pygal.style import BlueStyle

from pyPreservica import *

client = AdminAPI()
search = ContentAPI()
security_tags = client.security_tags()
results = {}
for tag in security_tags:
    filters = {"xip.security_descriptor": tag, "xip.document_type": "IO"}
    hits = search.search_index_filter_hits(query="%", filter_values=filters)
    results[tag] = hits

bar_chart = pygal.HorizontalBar(show_legend=False)
bar_chart.title = "Security Tag Frequency"
bar_chart.style = BlueStyle
bar_chart.x_title = "Number of Assets"
bar_chart.x_labels = results.keys()
bar_chart.add("Security Tag", results)

bar_chart.render_to_file("chart.svg")

28 Jan 2023
This is a brief user guide for creating OPEX XML documents using the 3rd party Spreadsheet Converter.

This website allows you to upload a spreadsheet containing descriptive metadata and generate XML documents compatible with Preservica.
Background
The spreadsheet converter makes a few simple assumptions about how data is stored in the spreadsheet. It assumes that each row of the spreadsheet contains descriptive metadata for a single Preservica Asset. For example one row corresponds to the metadata for a single document or image etc.
Your spreadsheet should contain a header row, the column names in the header will become the metadata attributes within the exported XML documents.
For example, for Dublin Core metadata you may have a spreadsheet similar to:

You may also have a column which contains the name of the digital object to which the metadata refers such as filename etc. The name of this column is not important. If you dont have a special column such as filename etc then one of the other column names must contain some unique information.

The spreadsheet column names can also contain prefixes, these can be used to add additional XML namespaces into the XML documents. The prefixes are seperated by “:” from XML attribute names.
Prefixes can be useful for XML schema’s such as Dublin Core where the XML attributes live inside a different namespace to the main XML root element.

The metadata is added to the rows under the column headings

and the spreadsheet should be exported to UTF-8 CSV.

You are now ready to upload the metadata.
Namespaces
The first field to enter on the website askes for a Root Element name

This field controls the name of the XML metadata root element. This is the element that all the spreadsheet column names are children of.
For example, to create OAI-DC type metadata such as:
<?xml version="1.0" encoding="UTF-8"?>
<oai_dc:dc  xmlns:oai_dc="http://www.openarchives.org/OAI/2.0/oai_dc/">
	<oai_dc:title>Title 001</oai_dc:title>
	<oai_dc:creator>James Carr</oai_dc:creator>
	<oai_dc:subject>Sheffield</oai_dc:subject>
	<oai_dc:description/>
	<oai_dc:publisher/>
	<oai_dc:contributor/>
	<oai_dc:date/>
	<oai_dc:type/>
	<oai_dc:format/>
	<oai_dc:identifier/>
	<oai_dc:source/>
	<oai_dc:language/>
	<oai_dc:rights/>
</oai_dc:dc>
The root element name is dc and the root element namespace is http://www.openarchives.org/OAI/2.0/oai_dc/
By default all the element names are within the root element namespace.

In this case the root element namespace and the Dublin Core elements should be in different namespaces, (15 term Dublin Core elements actually live inside the “http://purl.org/dc/elements/1.1/” namespace) so this is a good example of where we add a prefix to the column names, this allows us to associate additional namespaces to the elements.

After the CSV has been uploaded you need to select which column should be used to name the XML documents. This should be a column containing either the filename or other unique information

Naming Convention

This is where you can decide on what type of metadata you would like to export.
The first two options (.xml and .metatadata) create simple XML documents which would look like:
<?xml version="1.0" encoding="UTF-8"?>
<dc xmlns="http://www.openarchives.org/OAI/2.0/oai_dc/" xmlns:dc="http://purl.org/dc/elements/1.1/">
	<filename>image-0001.jpg</filename>
	<dc:title>Title 001</dc:title>
	<dc:creator>James Carr</dc:creator>
	<dc:subject>Sheffield</dc:subject>
	<dc:description/>
	<dc:publisher/>
	<dc:contributor/>
	<dc:date/>
	<dc:type/>
	<dc:format/>
	<dc:identifier/>
	<dc:source/>
	<dc:language/>
	<dc:rights/>
</dc>
The only difference being the file extension. The 3rd option wraps the XML in a OPEX header element ready for upload through the PUT tool.
<?xml version="1.0" encoding="UTF-8"?>
<opex:OPEXMetadata xmlns:dc="http://purl.org/dc/elements/1.1/" xmlns:oai_dc="http://www.openarchives.org/OAI/2.0/oai_dc/" xmlns:opex="http://www.openpreservationexchange.org/opex/v1.2">
	<opex:DescriptiveMetadata>
		<oai_dc:dc>
			<dc:title>Title 001</dc:title>
			<dc:creator>James Carr</dc:creator>
			<dc:subject>Sheffield</dc:subject>
			<dc:description/>
			<dc:publisher/>
			<dc:contributor/>
			<dc:date/>
			<dc:type/>
			<dc:format/>
			<dc:identifier/>
			<dc:source/>
			<dc:language/>
			<dc:rights/>
		</oai_dc:dc>
	</opex:DescriptiveMetadata>
</opex:OPEXMetadata>
This option allows you to format the XML to improve its readability by adding new lines and indenting elements.
Unique CSV Column
This option allows you to remove the additional column you may have added to store the object filename that should not be part of the XML. For example if you added a filename column in the spreadsheet.
Additional Namespaces
This field allows you to specify any additional namespaces which may be needed. For example every column prefix will need an additional namespace.

Download
Once the XML has been created, you are shown 4 download buttons.

The first button downloads a ZIP file containing a metadata document for each row in the spreadsheet. The name of the XML document is taken from the column used to identify the row.
The other buttons allow you to downloads an XSD schema for your metadata template, a template to allow you to custom the search index and a basic CMIS transform to allow the metadata to be displayed in UA.
22 Jan 2023
In the previous article we looked at how to create packages using package creation functions available in the pyPreservica API.
simple_asset_packagecomplex_asset_packagegeneric_asset_package
Each of these functions can be used to create packages of varying complexity and structure.
These functions provide sensible default values for the submission, but all the defaults can be overwitten.
Identifiers
Preservica Assets can contain multiple 3rd party external identifiers. Identifiers are key value pairs, the key is the identifier name or type.
Identifier values do not have to be unique.
The following shows a Preservica Asset with some common identifiers.

We can add identifiers to submission packages by creating a Python dictionary of identifier keys and values and passing it to one of the package creation methods.
For example to add two identifiers to our Asset we would create a dictionary object with two items.
identifiers = {"DOI": "doi:10.1038/nphys1170", "ISBN": "978-3-16-148410-0"}
We set the value on the option Identifier argument:
from pyPreservica import *

client = UploadAPI()
folder = "9fd239eb-19a3-4a46-9495-40fd9a5d8f93"
identifiers = {"DOI": "doi:10.1038/nphys1170", "ISBN": "978-3-16-148410-0"}

package = simple_asset_package("my-image.tiff",  parent_folder=folder, Identifiers=identifiers)

client.upload_zip_package(package)
Descriptive metadata is added to the package in a similar way to the 3rd party identifiers, you create a python dictionary object and populate the dictonary key
with the descriptive metadata schema namespace and the value of the dictionary object is a path to the xml document you would like to use.
metadata = {"http://www.openarchives.org/OAI/2.0/oai_dc/": "./metadata/dc.xml"}
You can use any metadata which is a well formed XML document. The dictionary object can contain as many XML documents as you need.
from pyPreservica import *

client = UploadAPI()
folder = "9fd239eb-19a3-4a46-9495-40fd9a5d8f93"
metadata = {"http://www.openarchives.org/OAI/2.0/oai_dc/": "./metadata/dc.xml"}

package = simple_asset_package("my-image.tiff",  parent_folder=folder, Asset_Metadata=metadata)

client.upload_zip_package(package)
Fixity
By default the simple_asset_package() and complex_asset_package() routines will create packages which contain SHA1 fixity values for each file.
You can override this default behaviour through the use of a callback which generates the required fixity on demand. The pyPreservica library provides default callbacks for SHA-1, SHA256 & SHA512
For example if you want to use SHA256 as your fixity algorithm on the preservation files use:
from pyPreservica import *

client = UploadAPI()
folder = "9fd239eb-19a3-4a46-9495-40fd9a5d8f93"

package = simple_asset_package("my-image.tiff",  parent_folder=folder, Preservation_files_fixity_callback=Sha256FixityCallBack())

client.upload_zip_package(package)
You can even choose to have different fixity algorithms for the preservaton files and the access files
from pyPreservica import *

client = UploadAPI()
folder = "9fd239eb-19a3-4a46-9495-40fd9a5d8f93"

package = simple_asset_package("my-image.tiff",  "my-image.jpg", parent_folder=folder, Preservation_files_fixity_callback=Sha512FixityCallBack(),  Access_files_fixity_callback=Sha256FixityCallBack())

client.upload_zip_package(package)
If you want to re-use existing externally generated fixity values for performance or integrity reasons then you can create a custom callback. The callback takes the filename and the path of the file which should have its fixity measured and should return a tuple containing the algorithm name and fixity value.
For example if your fixity sha256 values are stored in a spreadsheet (csv) alongside the file name you may want something similar to:
class CSVFixityCallback:

    def __init__(self, csv_file):
        self.csv_file = csv_file

    def __call__(self, filename, full_path):
        with open(self.csv_file, mode='r', encoding='utf-8-sig') as csv_file:
            csv_reader = csv.DictReader(csv_file, delimiter=',')
            for row in csv_reader:
                if row['filename'] == filename
                    fixity_value = row['sha256']
                    return "SHA256", fixity_value.lower()
from pyPreservica import *

client = UploadAPI()
folder = "9fd239eb-19a3-4a46-9495-40fd9a5d8f93"

package = simple_asset_package("my-image.tiff",  parent_folder=folder, Preservation_files_fixity_callback=CSVFixityCallback("./fixity.csv"))

client.upload_zip_package(package)
21 Jan 2023
pyPreservica is a 3rd party open source (Software Development Kit) SDK for the Preservica API.
It provides a range of services to allow users to access the full range of Preservica APIs from within simple Python scripts.
One of the most useful parts of pyPreservica is the ability to create a wide range of submission packages from
Python scripts programmatically without requiring the user to hand create XML documents.
Simple Packages
In pyPreservica simple packages are those which create a single Asset and which consist of a single digital object in the long term preservation representation and an optional access object.
Simple packages can be represented by the following diagram:
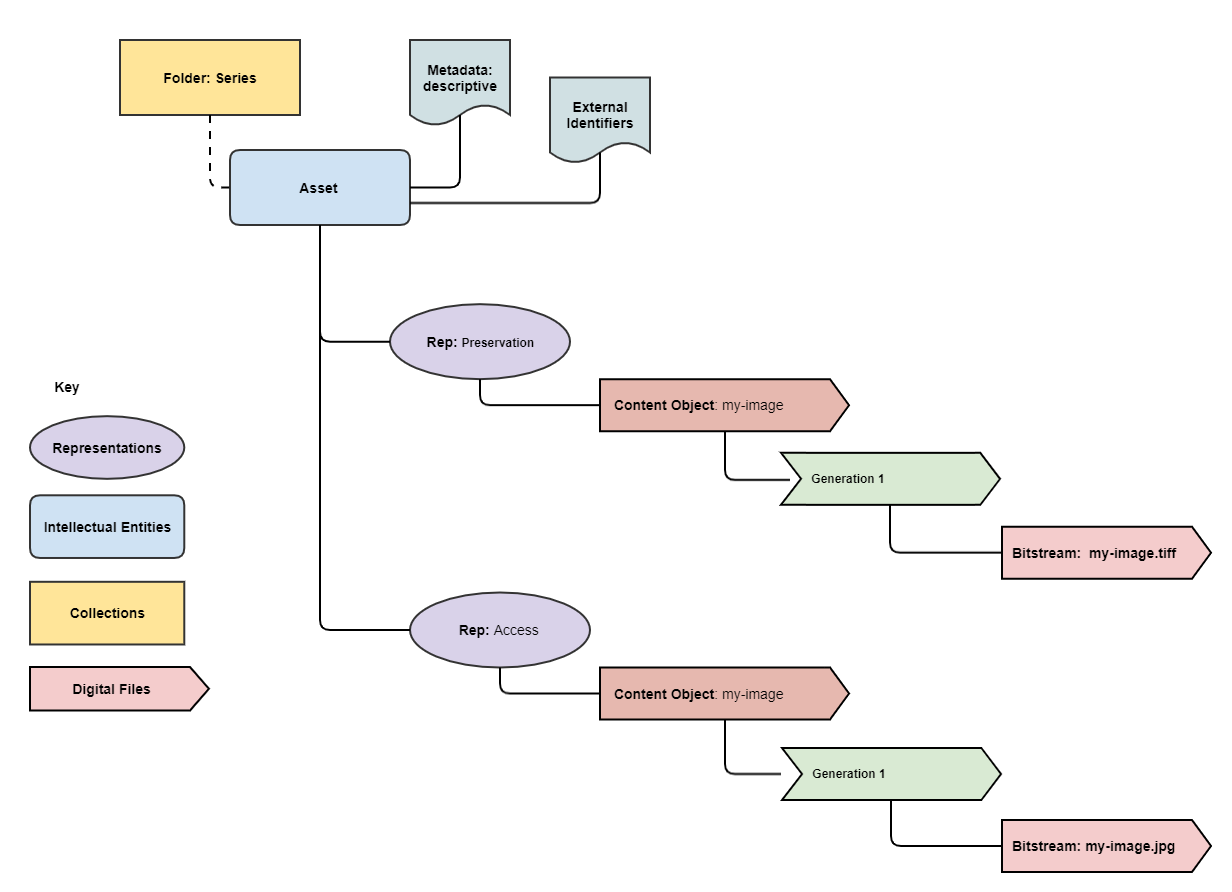
Simple packages contain one Content Object inside the preservation Representation and a single Content Object within an optional access Representation.
Simple packages can optionally contain additional descriptive metadata and 3rd party identifiers attached to the Asset.
To create a package containing a single Asset with one preservation object which will become the child of an existing folder or collection
we can use the following Python code:
package = simple_asset_package("my-image.tiff", parent_folder=folder)
This will create a zipped package with the correct metadata and content ready for upload and ingest.
The path to the newly created package is returned from the function.
To use this in a complete Python script which also uploads the package to Preservica, we pass the path to the package to an upload method.
For example a complete runnable Python script to create and ingest the Asset would be.
from pyPreservica import *

client = UploadAPI()
folder = "9fd239eb-19a3-4a46-9495-40fd9a5d8f93"
package = simple_asset_package("my-image.tiff",  parent_folder=folder)
client.upload_zip_package(package)
This file can be saved into a text file with the extension .py and run using a Python3 run time.
Here folder is the UUID of the parent collection the Asset should be ingested into.
NOTE: For details on how to authenticate the pyPreservica client with your Preservica system see the section on Authentication in the pyPreservica documentation.
After ingest you should see the following in Preservica.

If we also have an alternative version of the TIFF image such as a JPG file which we would like to be the access version, then we would use the same script, but add the access version as the second argument.
from pyPreservica import *

client = UploadAPI()
folder = "9fd239eb-19a3-4a46-9495-40fd9a5d8f93"
package = simple_asset_package("my-image.tiff", "my-image.jpg", parent_folder=folder)
client.upload_zip_package(package)
Which will give you the following Asset:

By default simple_asset_package() uses the file name as the default Asset title and description, in this case the default title would be “my-image”.

We can override that default behaviour by explicitly setting the Asset title and description by passing them as arguments to the function using optional keywords.
from pyPreservica import *

client = UploadAPI()
folder = "9fd239eb-19a3-4a46-9495-40fd9a5d8f93"
package = simple_asset_package("my-image.tiff", "my-image.jpg",  parent_folder=folder, Title="Asset Title", Description="Asset Description")
client.upload_zip_package(package)
We can also override the default “open” security tag on the Asset.
from pyPreservica import *

client = UploadAPI()
folder = "9fd239eb-19a3-4a46-9495-40fd9a5d8f93"
package = simple_asset_package("my-image.tiff", "my-image.jpg",  parent_folder=folder, Title="Asset Title", Description="Asset Description",  SecurityTag="closed" )
client.upload_zip_package(package)
Which will now populate the following fields.

Multi-part Packages
If your Assets consists of multiple digital objects, for example a book with multiple pages or a multi-media object such an mp4 file and a text file containing subtitles etc. then you will need to use the function complex_asset_package() method.
from pyPreservica import *

client = UploadAPI()
folder = "9fd239eb-19a3-4a46-9495-40fd9a5d8f93"

files = ["video.mp4", "video.srt"]

package = complex_asset_package(files,  parent_folder=folder)
client.upload_zip_package(package)
This function works in the same way as the simple_asset_package() method, apart from that it accepts lists of objects, rather than a single object.
You can also pass a list of access objects, the number of preservation and access objects do not have to be equal,
for example you can have fewer access objects in the Asset.
from pyPreservica import *

client = UploadAPI()
folder = "9fd239eb-19a3-4a46-9495-40fd9a5d8f93"

pres_files = ["page1.tif", "page2.tif", "page3.tif"]
access_files = ["book.pdf"]

package = complex_asset_package(pres_files, access_files, parent_folder=folder)
client.upload_zip_package(package)
complex_asset_package() will always retain the order of the objects in the lists, this way you can preserve the correct ordering of objects which is useful when rendering the Asset.

Multiple Representations
If you need more than one preservation or access representation then the method to use is generic_asset_package(), this provides the most flexibility when creating submissions at the price of slightly more complexity.
This function allows arbitrary numbers of both preservation and access representations to be created.
Instead of a list of objects you now pass a dictionary object, the key is the representation name and the value is the list of files.
from pyPreservica import *

client = UploadAPI()
folder = "9fd239eb-19a3-4a46-9495-40fd9a5d8f93"

preservation_rep = dict()
preservation_rep["Master"] = ["page1.tif", "page2.tif"," page3.tif"]
preservation_rep["Black White"] = ["page1.tif", "page2.tif"," page3.tif"]
preservation_rep["Greyscale"] = ["page1.tiff", "page2.tiff"," page3.tiff"]

access_rep = dict()
access_rep["Multi-Page Access"] = ["page-1.jpg", "page-2.jpg"," page-3.jpg"]
access_rep["Single-Page Access"] = ["book.pdf"]

package = generic_asset_package(preservation_rep, access_rep, parent_folder=folder)
The additional keyword arguments used by simple_asset_package() and complex_asset_package() such as Title, Description etc are still available.
Preservica will render the first access representation, so the viewer you want to use needs to be the first entry in the access dictionary.
Using the example above, if you want to use the multi-page book viewer as the default renderer, make “Multi-Page Access” the first entry,
if you want the PDF viewer to be the default renderer, then make “Single-Page Access” the first dictionary entry.
